Authenticate Using Facebook Login on Android – Firebase

Standard

I’m writing this blog post because I couldn’t find a proper tutorial which explains, adding Facebook Sign-In to android project with all new Google Firebase properly.This post will explain you how to add Facebook login to your android application using Google Firebase authentication. So let’s start,

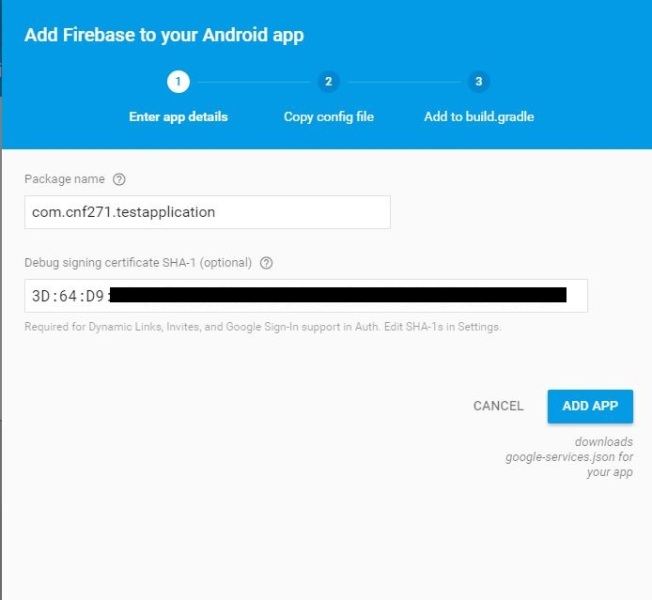
Create your Firebase project from Firebase Console and select Android as your platform.

Then add your project’s package name and SHA-1 key in the prompted view as shows below.

1

How to generate a SHA -1 key Step by Step

  1. Download openssl
  2. Extract openssl zip and  create a folder OpenSSL in C:/ and copy the extracted code
  3. Now go to your Java bin folder ( C:\Program Files (x86)\Java\jre1.8.0_25\bin )
  4. Now open the command prompt inside the bin folder and execute the following command
   keytool -list -v -keystore "%USERPROFILE%\.android\debug.keystore" -alias
 androiddebugkey -storepass android -keypass android

This command will generate a SHA-1 key under “Certificate fingerprints” in cmd.Copy SHA-1 and paste it in your firebase project.

After adding a package name and SHA-1 key(completing the first step)  Firebase will generate a json file in the second step and it will be automatically downloaded to your device.

Copy the json file and paste it in the project’s module app/ folder.

Since we have added json file to our android project we need to sync our android project with google service.In order to do that add following code to your Project’s gradle file and sync.

buildscript {
    // ...
    dependencies {
        // ...
        classpath 'com.google.gms:google-services:3.0.0'
    }
}

And add the following dependencies in your Module’s gradle file

dependencies {
  compile 'com.google.firebase:firebase-core:9.2.1'
}

add the following code at the bottom of the gradle file and Sync the gradle file with the changes.

apply plugin: 'com.google.gms.google-services'

Enabling Facebook Sign-in on Firebase

Please follow these steps to enable Facebook Sign-In

  • Go to your Firebase project console
  • Click Auth under Develop section
  • Select Sign-in method tab and enable Facebook Sign-In by giving Facebook App Id and App Secret

To create a Facebook App please click here

Generate a Key hash for Facebook App

In order to continue with your Facebook Application you may need to add a Key hash for your Facebook App.So here is what you need to do,

If you haven’t installed OpenSSL in your machine,please follow these steps.

  1. Download openssl
  2. Extract openssl zip and  create a folder OpenSSL in C:/ and copy the extracted code

else,

  1. Go to your Java bin folder ( C:\Program Files (x86)\Java\jre1.8.0_25\bin )
  2. Now open the command prompt inside the bin folder and execute the following command
  3. Provide password “android” as when you are prompted.
keytool -exportcert -alias androiddebugkey -keystore
 %HOMEPATH%\.android\debug.keystore | "C:\OpenSSL\bin\openssl"
 sha1 -binary | "C:\OpenSSL\bin\openssl" base64

2

This will generate a unique key hash for your android application.

Implementing the Facebook-Login Activity

To start working with Facebook authentication we need to add Firebase Authentication dependencies to our android project. Please add the following dependency in your app-level gradle and compile.

compile 'com.google.firebase:firebase-auth:9.2.1'

and to add Facebook SDK to our android project please add the following dependency to app-level gradle and compile.

compile 'com.facebook.android:facebook-android-sdk:4.14.0'

Check the latest Facebook SDK version from here.

After the gradle sync if you get an error like this “No resource found that matches the given name (at ‘cardBackgroundColor’ with value ‘?android:attr/colorBackgroundFloating’)”. Please add the following dependecy to your app-level gradle and Sync.

compile('com.android.support:cardview-v7:23.2.0') {
 force = true
 }

Add the Following code to AndroidManifest.

<activity android:name="com.facebook.FacebookActivity"
 android:configChanges=
 "keyboard|keyboardHidden|screenLayout|screenSize|orientation"
 android:theme="@android:style/Theme.Translucent.NoTitleBar"
 android:label="@string/app_name" />

Now create a new layout in your projects folder.I’m going to name my layout as activity_facebooklogin. add the following code inside your layout.

<com.facebook.login.widget.LoginButton
 android:id="@+id/login_button"
 android:layout_width="wrap_content"
 android:layout_height="wrap_content"
 android:layout_gravity="center_horizontal"
 android:layout_marginTop="30dp"
 android:layout_marginBottom="30dp" />

I’m going to add a new activity called FacebookLoginActivity and I will implement Facebook login button in this activity.

package com.cnf271.testapplication;

import android.content.Intent;
import android.os.Bundle;
import android.support.annotation.NonNull;
import android.support.v7.app.AppCompatActivity;
import android.widget.Toast;

import com.facebook.AccessToken;
import com.facebook.CallbackManager;
import com.facebook.FacebookCallback;
import com.facebook.FacebookException;
import com.facebook.FacebookSdk;
import com.facebook.login.LoginResult;
import com.facebook.login.widget.LoginButton;
import com.google.android.gms.tasks.OnCompleteListener;
import com.google.android.gms.tasks.Task;
import com.google.firebase.auth.AuthCredential;
import com.google.firebase.auth.AuthResult;
import com.google.firebase.auth.FacebookAuthProvider;
import com.google.firebase.auth.FirebaseAuth;
import com.google.firebase.auth.FirebaseUser;

import java.util.Arrays;

/**
 * Created by Cnf on 8/3/2016.
 */
public class FacebookLoginActivity extends AppCompatActivity{

    private LoginButton loginButton;
    private CallbackManager callbackManager;

    private FirebaseAuth firebaseAuth;
    private FirebaseAuth.AuthStateListener firebaseAuthListner;

    @Override
    protected void onCreate(Bundle savedInstanceState) {
        super.onCreate(savedInstanceState);
        FacebookSdk.sdkInitialize(this.getApplicationContext());
        setContentView(R.layout.activity_facebooklogin);

        callbackManager = CallbackManager.Factory.create();

        loginButton = (LoginButton) findViewById(R.id.login_button);

        loginButton.setReadPermissions(Arrays.asList("email"));
        loginButton.registerCallback(callbackManager, new FacebookCallback<LoginResult>() {
            @Override
            public void onSuccess(LoginResult loginResult) {
                handleFacebookAccessToken(loginResult.getAccessToken());
            }

            @Override
            public void onCancel() {
                Toast.makeText(getApplicationContext(),"Cancel",Toast.LENGTH_SHORT).show();
            }

            @Override
            public void onError(FacebookException error) {
                Toast.makeText(getApplicationContext(),"Error",Toast.LENGTH_SHORT).show();
            }
        });

        firebaseAuth = FirebaseAuth.getInstance();
        firebaseAuthListner = new FirebaseAuth.AuthStateListener(){
            @Override
            public void onAuthStateChanged(@NonNull FirebaseAuth firebaseAuth) {
                FirebaseUser user = firebaseAuth.getCurrentUser();
                if(user != null){
                    goMainScreen();
                }
            }
        };
    }

    private void handleFacebookAccessToken(AccessToken accessToken) {
        AuthCredential credential = FacebookAuthProvider.getCredential(accessToken.getToken());
        firebaseAuth.signInWithCredential(credential).addOnCompleteListener(this, new OnCompleteListener<AuthResult>() {
            @Override
            public void onComplete(@NonNull Task<AuthResult> task) {
                if(!task.isSuccessful()){
                    Toast.makeText(getApplicationContext(),R.string.firebase_error_login, Toast.LENGTH_LONG).show();
                }
            }
        });
    }

    @Override
    protected void onActivityResult(int requestCode, int resultCode, Intent data) {
        super.onActivityResult(requestCode, resultCode, data);
        callbackManager.onActivityResult(requestCode,resultCode,data);
    }

    @Override
    protected void onStart() {
        super.onStart();
        firebaseAuth.addAuthStateListener(firebaseAuthListner);
    }

    @Override
    protected void onStop() {
        super.onStop();
        firebaseAuth.removeAuthStateListener(firebaseAuthListner);
    }

    public void goMainScreen(){
        Intent intent = new Intent(this, MainActivity.class);
        intent.addFlags(Intent.FLAG_ACTIVITY_CLEAR_TOP | Intent.FLAG_ACTIVITY_CLEAR_TASK | Intent.FLAG_ACTIVITY_NEW_TASK);
        startActivity(intent);
    }
}

Please add the following code to your strings.xml file.

<string name="firebase_error_login">Firebase Login Error</string>
<string name="facebook_app_id">YOUR APP ID</string>

Add the following code to AndroidManifest file.

<activity android:name=".FacebookLoginActivity">
    <intent-filter>
        <action android:name="android.intent.action.VIEW" />
    </intent-filter> </activity>
<meta-data android:name="com.facebook.sdk.ApplicationId" android:value="@string/facebook_app_id"/>

Please add the following code to your MainActivity.

package com.cnf271.testapplication;

import android.support.v7.app.AppCompatActivity;
import android.os.Bundle;
import android.content.Intent;
import android.view.View;

import com.facebook.AccessToken;
import com.facebook.FacebookSdk;
import com.facebook.login.LoginManager;

public class MainActivity extends AppCompatActivity {

    @Override
    protected void onCreate(Bundle savedInstanceState) {
        super.onCreate(savedInstanceState);
        FacebookSdk.sdkInitialize(this.getApplicationContext());
        setContentView(R.layout.activity_main);

        if (AccessToken.getCurrentAccessToken() == null) {
            goLoginScreen();
        }
    }

    private void goLoginScreen() {
        Intent intent = new Intent(this, FacebookLoginActivity.class);
        intent.addFlags(Intent.FLAG_ACTIVITY_CLEAR_TOP | Intent.FLAG_ACTIVITY_CLEAR_TASK | Intent.FLAG_ACTIVITY_NEW_TASK);
        startActivity(intent);
    }

    public void logout(View view) {
        LoginManager.getInstance().logOut();
        goLoginScreen();
    }
}

Make sure to initialize the Facebook sdk before setting the ContentView.(check onCreate method)

That’s all folks. If you have done everything according to the post Application will run and Facebook Login layout will pop up and once you have logged in using your Facebook credentials you will be redirected to hello world Main layout.

Screenshot_2016-08-04-00-15-20              Screenshot_2016-08-04-00-15-59                   Screenshot_2016-08-04-00-16-18

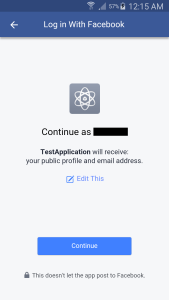
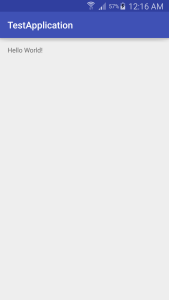
(Mobile Application images)

3

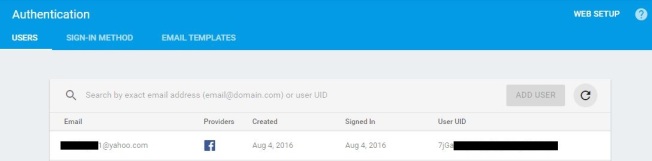
(Firebase Users table)

Please download the project’s source files from my Github.

Thanks. Stay tuned for more posts.

Passing data between two tables – Symfony2

Standard

In Symfony2 framework it’s easy to pass data between tables. Symfony2 framework is using entities instead of queries.

For example : There are two entities called Books and Author. I want pass data from Books table to Author Table.

public function BookAuthorAction(Request $request, $id) {

    $response = new Response();
    $em = $this->getDoctrine()->getManager();

    $books = $em->getRepository('BooksBundleBundle:Books')->find($id);
    $author = new Author();

    $author->setBookName($books->getBookName());
    $author->setIsbnNo($books->getIsbnNo());

    $em->persist($author);
    $em->flush();

    return $response;
}

To pass a string when inserting into Author table from Books table

$author->setBookType('drama'); //passing a string as a book type

Delete data from Books table.

$em->remove($book

Clear Text Field value from drop down using jQuery

Standard

This post shows you how to clear the text value every time user select a different option from the drop down.

</pre>
<div class="row">
<div class="col-sm-6">
<div class="form-group form-group-default">
<label>Food</label>
<select id="fooditems" name="fooditems" class="full-width" ><option value="">Select Type</option><option value="Burger">Burger</option><option value="Sandwich">Sandwich</option></select>
</div>
</div>
<div class="col-sm-6">
<div class="form-group form-group-default">
<label>Display Food</label>
<input id="displayfood" name="displayfood" type="text" class="form-control" >
</div>
</div>
</div>
<pre>

Javascript Code

</pre>

<script type="text/javascript">
$(document).ready(function () {
$('#fooditems').change(function () {
$('#displayfood').val("");
});
});
</script>
<pre>

Enable a text field when option is selected from drop down using jQuery

Standard

This post shows you how to disable a field in a form on start and enable it when one of the option is selected from the Drop down.


<div class="row">
 <div class="col-sm-6">
 <div class="form-group form-group-default">
 <label>Sport</label>
 <select id="sportdropdown" name="sport" class="full-width" >
 <option value="">Select Type</option> 
 <option value="Cricket">Cricket</option> 
 <option value="Football">Football</option> 
 </select>
 </div>
 </div>
 <div class="col-sm-6">
 <div class="form-group form-group-default">
 <label>Your Sport</label>
 <input id="viewsport" name="viewselectedsport" type="text" class="form-control" > 
 </div>
 </div>
 </div>

JavaScript code


 <script type="text/javascript">
 $("#sportdropdown").change(function () {
 var sport = $(this).val();

 if (!sport) {
 $("#viewsport").attr("disabled", true);
 return false;
 }
 $("#viewsport").attr("disabled", false);
 });

 $("#sportdropdown").trigger("change");
 </script>

How to add Volley library to Android project

Standard
  • To add volley library to a android project first we need to download Git software.Git software is used to clone git project. To download Git Software click here

(When installing Git make sure you select Use Git from the windows command prompt )

To download Volley library

  1. first create a new folder and add folder path to your command prompt.
  2. Type the following command line in the command prompt
git clone https://android.googlesource.com/platform/frameworks/volley

1

After downloading the volley library to your Folder, make sure you get the following result

2

To add volley Library to Android studio Project

Project > New > Module > Import Existing Project > [Browse and select volley folder you just downloaded] > Finish

3

(Make sure your Module name is :volley )

Now add the following code to the build.gradle file under dependencies ([Your Project ]> app > build.gradle )

compile project(‘:volley’)

4

Now Sync the project with Gradle Files.This is how you add  volley library to Android Studio Project !

See you soon  !

Installing and Configuring Symfony2 [SOLVED] ERROR: ‘Symfony2 console must be selected’

Standard

From This Blog post I’m going to show you how to install and configure Symfony2 successfully

symfony2-acl-1-638

  • Download Symfony standard 2.7 Zip file  (Since Netbeans only supports ZIP files) Symfony standard zip file can be download from Symfony Github repositary)

Download Symfony standard 2.7 – symfony-standard – 2.7

  • Setting Symfony2 as php Framework

to set Symfony2 as Php framework Tools > Options > [Select Php] > [Select Frameworks & Tools ] > Select Symfony2 as Framework.(now browse and locate Symfony standard 2.7 ZIP file) > Click Apply > Click Ok

s1

  • Now It’s time to create a Php Project using Netbeans

To create a new Php project File > New Project > Select PHP > Php Application

s2

  • Create the project as follows

*make sure your source folder is a newly created Folder located in Wamp/www folder

s3

s4

  • Select Symfony2 as Php Framework

s6

Now you have successfully created a Php project using Symfony2 as your Framework. Congrats !

Read the rest of this entry

Download English data set

Standard

Download English data set

datasetk

download

accessing images

for i = 1:26
for j = 1:10
readimage = sprintf(‘img%03d-%05d.jpg’, i,j-1);
img = imread(readimage);
%comment                                                                                                                                                                 %comment
end
end

How to configure Maven in eclipse

Standard

Hi there from this post i’m going to show you how to install Maven build tool & Maven plugin properly in Eclipse.

and then download the Maven (Binary zip) under “current stable version of Maven

after downloading maven build tools, we need to add maven to Environment variables tools

My computer > Click properties > Select ‘Advanced System settings‘ > select ‘Advanced‘ tab >                                               click Environment  variables

       Under System Variables section select New to add a new Variable and fill variable details.(check figure 1)maven1figure 1

     variable name : MAVEN_HOME

     variable path :   ‘root folder path’

  •     when adding root folder path make sure you are adding the correct path. (check figure 2)

maven2figure  2

 and then add maven to your path folder

 to add maven to your path folder click Path under System variables and click edit

 then add below code at the end of the path value (check figure 3)

  ;%MAVEN_HOME%\bin

maven3figure 3

  • To make sure you have installed Maven build tool properly go to command prompt and type :

        mvn –version

  • then you will get the following response if you have installed maven build tool properly.(Check figure 4)

maven4figure 4

  • just installing Maven build tool is not enough.To build projects from Maven we need to install maven plugin in eclipse.

To install Maven plugin in eclipse click help > Select Install New Software and then add following path to add a new            plugin

http://download.eclipse.org/technology/m2e/releases/

then select m2e – Maven Integration for Eclipse > select next > and install (Check figure 5)

maven5

figure 5


Congratulations now you have successfully installed Maven build tools & Maven plugin !

Android Studio Tips & Tricks

Standard

Hi there ! Welcome to my personal IT blog.From my 2nd blog post i’m going to show you some Android Studio Tips and Tricks.


1) How to change the package name in Android studio

for example let’s say you want to change package name ‘blogpost2.cnf271.com.sampleApplication’ into ‘blogpost2.cnf271.com.mysampleApplication’

1) Click Setting icon in the top right corner

2

2) deselect compact Empty middle packages

3

now select package folder & rename it using Refactor

4


2) How to change SDK path in AndroidStudio

1st method – Click File > Click Project Structure

12

2nd method – Click on Application Name > click Open Module Settings

5


Then select SDK Location > under Android Studio Location change the SDK path

6


3) How to change the comple SDK version in a project

1st method – Click File > Click Project Structure

2nd method – Click on Application Name > click Open Module Settings

  • Select app (under Modules section left corner)
  • set the Compile Version from the list and Click Ok

7


4) How to run your application on a Device

To run a application on a device you need to enable USB debugging.

http://developer.android.com/tools/device.html

  • Make sure your phone is not locked when deploying application to your mobile.

Click Play 

8


Then Select your Device from ‘choose a running device’ section and select OK

9


5) How to change Short keys in Android Studio

to change Short keys in android studio Click File > Click Settings 

10


Then select Keymap and edit Short Keys

11


Few Useful Short Keys


  • Open File : CTRL+SHIFT+n
  • Search by Symbol Name : CTRL + ALT + SHIFT + N
  • Generate Method : ALT + Insert
  • Add unimplemented methods: CTRL + I
  • Recently edited files : CTRL+SHIFT+E
  • Override methods: CTRL + O
  • Reformat code: CTRL + ALT + L
  • Show project: ALT + 1
  • Show logcat: ALT + 6
  • Hide project – logcat: SHIFT + ESC
  • Build: CTRL + F9
  • Build and Run: CTRL + F10
  • Collapse all: CTRL + SHIFT + NumPad +
  • Expand all: CTRL + SHIFT + NumPad -
  • Find and replace: CTRL + R
  • Find: CTRL + F
  • Last edit Location : CTRL+SHIFT+backspace

Thank You ! 

@cnf271

How to Create a MVC Login Application in a few easy steps

Standard

1) Open Microsoft Visual Studio 2013 and select NewProject

1

2) Select Web under Visual C#

2

3) Now select ‘.Net Framework 4.5‘ as application’s Framework version

3

4) Now select ASP .NET Web Application and name your Application. I named my application as ‘MyMVCLoginApplication’ and then click Ok.

5

5) and then select ‘MVC‘ as application’s template and click Ok

6

6) Now run your application using a Internet browser. (my default we browser is Google Chrome)

10

7) BINGO ! now you have created a simple MVC Login Application

7

8) You can register a account by clicking Register button

8

9) There You are !

9

Thank You ! Stay tuned for more updates !